آموزش ListView در سی شارپ
سلام دوستان در این سری از آموزش برنامه نویسی سی شارپ به آموزش ListView در سی شارپ به آموزش ListView در سی شارپ می پردازیم از ListView به منظور نمایش لیستی از داده ها استفاده می شود در ادامه برخی از ویژگی های ListView را نیز بیان کرده و نحوه نمایش ListView در سی شارپ را به شما آموزش میدهیم.
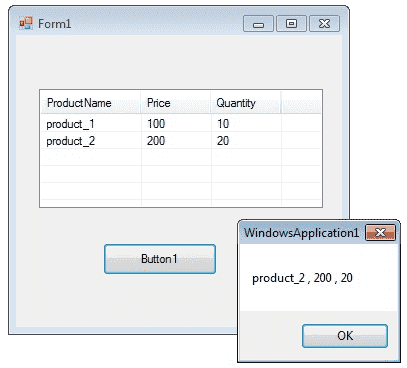
نتیجه کلی برنامه همانند زیر خواهد بود.
ابتدای کار شما باید یک ListView را در صفحه windows form خود قرار دهید کافی است بخش toolbox آن را سرچ کرده سپس بعد از انتخاب آن را درگ کنید.
برای اینکه یک ستون به ListView اضافه کنید می توانید از کد زیر استفاده کنید.
1 | listView1.Columns.Add("ProductName", 100); |
در بالا ورودی اولی نام ستون و ورودی دومی اندازه ستون خواهد بود.
برای اینکه یک سطر اضافه کنید مثل زیر عمل کنید.
1 2 3 4 5 6 7 | string[] arr = new string[4]; ListViewItem itm; arr[0] = "product_1"; arr[1] = "100"; arr[2] = "10"; itm = new ListViewItem(arr); listView1.Items.Add(itm); |
کد بالا یک سطر یا یک ردیف اضافه می کند.
برای اینکه ListView را Sort کنید از کد زیر استفاده کنید.
1 | ListView1.Sorted = true; |
برای اینکه آیتم انتخاب شده را بگیرید از کد زیر استفاده کنید.
1 | productName = listView1.SelectedItems[0].SubItems[0].Text; |
برای اینکه یک CheckBox به آن اضافه کنید مثل زیر عمل کنید.
1 2 | myListView.CheckBoxes = true; myListView.Columns.Add(text, width, alignment); |
برای اینکه قابلیت خط دار و قابلیت انتخاب کل ردیف فعال شود از کد زیر استفاده کنید.
1 2 3 | listView1.View = View.Details; listView1.GridLines = true; listView1.FullRowSelect = true; |
کدی که در برنامه استفاده کرده ایم همانند زیر است. (قبل از استفاده از کد زیر یک Button و یک ListView قرار دهید.)
1 2 3 4 5 6 7 8 9 10 11 12 13 14 15 16 17 18 19 20 21 22 23 24 25 26 27 28 29 30 31 32 33 34 35 36 37 38 39 40 41 42 43 44 45 46 47 48 | using System; using System.Drawing; using System.Windows.Forms; namespace WindowsFormsApplication1 { public partial class Form1 : Form { public Form1() { InitializeComponent(); } private void Form1_Load(object sender, EventArgs e) { listView1.View = View.Details; listView1.GridLines = true; listView1.FullRowSelect = true; //Add column header listView1.Columns.Add("ProductName", 100); listView1.Columns.Add("Price", 70); listView1.Columns.Add("Quantity", 70); //Add items in the listview string[] arr = new string[4]; ListViewItem itm ; //Add first item arr[0] = "product_1"; arr[1] = "100"; arr[2] = "10"; itm = new ListViewItem(arr); listView1.Items.Add(itm); //Add second item arr[0] = "product_2"; arr[1] = "200"; arr[2] = "20"; itm = new ListViewItem(arr); listView1.Items.Add(itm); } private void button1_Click(object sender, EventArgs e) { string productName = null; string price = null; string quantity = null; productName = listView1.SelectedItems[0].SubItems[0].Text; price = listView1.SelectedItems[0].SubItems[1].Text; quantity = listView1.SelectedItems[0].SubItems[2].Text; MessageBox.Show (productName + " , " + price + " , " + quantity); } } } |
این آموزش هم به پایان رسید.
موفق و پیروز باشید.
 آموزش برنامه نویسی اندروید |


واقعن گویا و امونده بود.بسیااار تشکر