آموزش سرچ در RecyclerView در برنامه نویسی اندروید
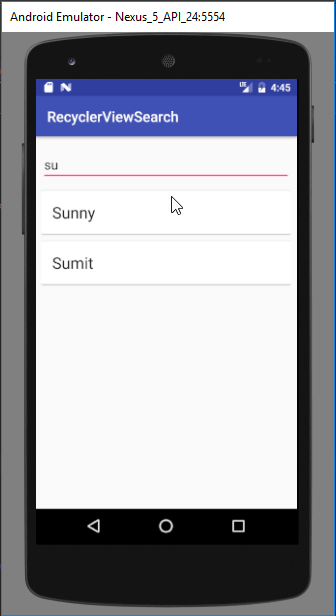
سلام دوستان در این سری از آموزش برنامه نویسی اندروید به آموزش سرچ در RecyclerView در برنامه نویسی اندروید می پردازیم سرچ یکی از function های اصلی در برنامه است که سبب می شود برنامه شما User Friendly شود شاید بسیاری از اپلیکیشن ها را دیده باشید که بخشی برای جستجو کردن نداشته باشند و شاید همین عیب سبب شود آن اپلیکیشن را شما حذف کنید در می توانید پیش نماشی از ماحصل کار را مشاهده کنید با ما همراه باشید.
اضافه کردن CardView و RecyclerView
وارد فایل Build.Gradle شده سپس در بخش dependencies دو خط زیر را اضافه کنید.
1 2 3 4 | // RecyclerView compile 'com.android.support:recyclerview-v7:24.3.+' // CardView compile 'com.android.support:cardview-v7:24.3.+' |
پروژه را Sync کنید.
فایل Layout من که نام آن activity_main.xml است همانند زیر است.
1 2 3 4 5 6 7 8 9 10 11 12 13 14 15 16 17 18 19 20 21 22 23 24 25 26 27 28 29 30 31 32 33 34 35 36 37 38 39 40 41 42 43 44 45 | <?xml version="1.0" encoding="utf-8"?> <android.support.constraint.ConstraintLayout xmlns:android="http://schemas.android.com/apk/res/android" xmlns:app="http://schemas.android.com/apk/res-auto" xmlns:tools="http://schemas.android.com/tools" android:layout_width="match_parent" android:layout_height="match_parent" tools:context="net.simplifiedlearning.recyclerviewsearch.MainActivity"> <EditText android:id="@+id/editTextSearch" android:layout_width="0dp" android:layout_height="wrap_content" android:hint="Enter search term" tools:layout_constraintTop_creator="1" tools:layout_constraintRight_creator="1" android:layout_marginStart="8dp" android:layout_marginEnd="8dp" app:layout_constraintRight_toRightOf="parent" android:layout_marginTop="16dp" tools:layout_constraintLeft_creator="1" app:layout_constraintLeft_toLeftOf="parent" app:layout_constraintTop_toTopOf="parent" android:layout_marginLeft="8dp" android:layout_marginRight="8dp" /> <android.support.v7.widget.RecyclerView android:id="@+id/recyclerView" android:layout_width="0dp" android:layout_height="0dp" tools:layout_constraintTop_creator="1" tools:layout_constraintRight_creator="1" tools:layout_constraintBottom_creator="1" android:layout_marginStart="8dp" app:layout_constraintBottom_toBottomOf="parent" android:layout_marginEnd="8dp" app:layout_constraintRight_toRightOf="parent" android:layout_marginTop="8dp" app:layout_constraintTop_toBottomOf="@+id/editTextSearch" tools:layout_constraintLeft_creator="1" android:layout_marginBottom="8dp" app:layout_constraintLeft_toLeftOf="parent" android:layout_marginLeft="8dp" android:layout_marginRight="8dp" app:layout_constraintHorizontal_bias="0.0" app:layout_constraintVertical_bias="1.0"> </android.support.v7.widget.RecyclerView> </android.support.constraint.ConstraintLayout> |
در کد بالا از ConstraintLayout استفاده شده است در صورتی که نمی خواهید از این لایه گوگل استفاده کنید کافی است آن را با Linear جایگزین کنید قبلا ConstraintLayout را مفصل توضیح داده ایم می توانید از لینک زیر استفاده کنید.
آموزش ConstraintLayout در برنامه نویسی اندروید
در بالا یک Editext و یک RecyclerView قرار داده شده است.
ما به یک layout دیگر به منظور استفاده از آن به عنوان base style آیتم ها نیاز داریم پس یک فایل به نام list_layout.xml در layout خود ایجاد کرده و کدهای زیر را در آن قرار دهید.
1 2 3 4 5 6 7 8 9 10 11 12 13 14 15 16 17 18 | <?xml version="1.0" encoding="utf-8"?> <LinearLayout xmlns:android="http://schemas.android.com/apk/res/android" android:layout_width="match_parent" android:layout_height="wrap_content" android:orientation="vertical"> <android.support.v7.widget.CardView android:layout_marginTop="5dp" android:layout_marginBottom="5dp" android:layout_width="match_parent" android:layout_height="wrap_content"> <TextView android:id="@+id/textViewName" android:padding="15dp" android:textAppearance="@style/Base.TextAppearance.AppCompat.Large" android:layout_width="match_parent" android:layout_height="wrap_content" /> </android.support.v7.widget.CardView> </LinearLayout> |
در بالا از یک CardView و یک TextView استفاده شده است (شکل ظاهری آیتم ها را تشکیل می دهد).
به منظور اینکه لایه بالا را با RecyclerView ارتباط دهیم باید از Adapter استفاده کنیم پس یک فایل جاوا به نام CustomAdapter.java ایجاد کرده و کدهای زیر را در آن قرار دهید.
1 2 3 4 5 6 7 8 9 10 11 12 13 14 15 16 17 18 19 20 21 22 23 24 25 26 27 28 29 30 31 32 33 34 35 36 37 | package ir.programchi; import android.support.v7.widget.RecyclerView; import android.view.LayoutInflater; import android.view.View; import android.view.ViewGroup; import android.widget.TextView; import java.util.ArrayList; /** * Created by Jfp on 6/6/2018. */ public class CustomAdapter extends RecyclerView.Adapter<CustomAdapter.ViewHolder> { private ArrayList<String> names; public CustomAdapter(ArrayList<String> names) { this.names = names; } @Override public ViewHolder onCreateViewHolder(ViewGroup parent, int viewType) { View v = LayoutInflater.from(parent.getContext()) .inflate(R.layout.list_layout, parent, false); return new ViewHolder(v); } @Override public void onBindViewHolder(ViewHolder holder, int position) { holder.textViewName.setText(names.get(position)); } @Override public int getItemCount() { return names.size(); } class ViewHolder extends RecyclerView.ViewHolder { TextView textViewName; ViewHolder(View itemView) { super(itemView); textViewName = (TextView) itemView.findViewById(R.id.textViewName); } } } |
سپس باید از این آداپتور استفاده کنیم.
در نهایت کد های MainActivity.java همانند زیر می شود.
1 2 3 4 5 6 7 8 9 10 11 12 13 14 15 16 17 18 19 20 21 22 23 24 25 26 27 28 29 30 31 32 33 34 35 36 37 38 | package ir.programchi; import android.support.v7.app.AppCompatActivity; import android.os.Bundle; import android.support.v7.widget.LinearLayoutManager; import android.support.v7.widget.RecyclerView; import android.text.Editable; import android.text.TextWatcher; import android.widget.EditText; import java.util.ArrayList; public class MainActivity extends AppCompatActivity { RecyclerView recyclerView; EditText editTextSearch; ArrayList<String> names; CustomAdapter adapter; @Override protected void onCreate(Bundle savedInstanceState) { super.onCreate(savedInstanceState); setContentView(R.layout.activity_main); names = new ArrayList<>(); names.add("JFP"); names.add("ALI"); names.add("SEPEHR"); names.add("KIANOOSH"); names.add("SAMAN"); names.add("SHEYDA"); names.add("BAHAR"); names.add("SETAREH"); names.add("SOHRAB"); names.add("MAHTAB"); names.add("KATY"); recyclerView = (RecyclerView) findViewById(R.id.recyclerView); editTextSearch = (EditText) findViewById(R.id.editTextSearch); recyclerView.setHasFixedSize(true); recyclerView.setLayoutManager(new LinearLayoutManager(this)); adapter = new CustomAdapter(names); recyclerView.setAdapter(adapter); } } |
این آموزش هم همانند آموزش های قبلی به پایان رسید.
موفق و پیروز باشید.