آموزش ساخت RecyclerView با کوتلین در اندروید
سلام دوستان امیدوارم حالتون خوب باشد در این سری از آموزش برنامه نویسی اندروید به آموزش ساخت RecyclerView با کوتلین در اندروید خواهیم پرداخت همانطور که قول داده بودیم سعی می کنیم آموزش های اندروید را به زبان کوتلین نیز برای شما قرار دهیم علت استفاده از این زبان در مطالب قبلی برای شما قرار دادیم در ادامه لینک آنها را نیز قرار میدهم و می توانید پیش نمایشی از آن را مشاهده کنید با ما همراه باشید.
چرا باید از زبان کوتلین استفاده کنیم ؟
همینطور برای اضافه کردن کوتلین به اندروید استودیو از لینک زیر استفاده کنید ما دیگر این بخش را تکرار نخواهیم کرد.
آموزش اضافه کردن کوتلین به اندروید استودیو
ما در این آموزش از لایه constraintlayout استفاده می کنیم پس باید آموزش زیر را نیز مطالعه کنید.
constraintlayout چیست ؟
بعد از اینکه کوتلین را به اندروید استودیو اضافه کردید وارد فایل Build.Gradle از نوع Module شده و در بخش dependencies کتاب خانه های زیر را اضافه کنید.
1 2 | compile 'com.android.support:recyclerview-v7:25.0.0' compile 'com.android.support:cardview-v7:25.0.0' |
پروژه را sync کنید.
ابتدا وارد layout مربوطه شده در اینجا نام آن برابر با activity_main.xml است و کدهای زیر را در آن قرار دهید (layout اصلی ما در این پروژه).
1 2 3 4 5 6 7 8 9 10 11 12 13 14 15 16 17 18 19 20 21 22 23 | <?xml version="1.0" encoding="utf-8"?> <android.support.constraint.ConstraintLayout xmlns:android="http://schemas.android.com/apk/res/android" xmlns:app="http://schemas.android.com/apk/res-auto" xmlns:tools="http://schemas.android.com/tools" android:layout_width="match_parent" android:layout_height="match_parent" tools:context=".MainActivity"> <android.support.v7.widget.RecyclerView android:id="@+id/recyclerView" android:layout_width="0dp" android:layout_height="0dp" tools:layout_editor_absoluteX="8dp" tools:layout_editor_absoluteY="8dp" android:layout_marginTop="8dp" android:layout_marginBottom="8dp" app:layout_constraintEnd_toEndOf="parent" app:layout_constraintTop_toTopOf="parent" app:layout_constraintStart_toStartOf="parent" app:layout_constraintBottom_toBottomOf="parent" android:layout_marginStart="8dp" android:layout_marginEnd="8dp" /> </android.support.constraint.ConstraintLayout> |
در بالا یک Recyclerview قرار گرفته است بقیه کدهای برای Responsive شدن آن است.
حالا باید شکل ظاهری هر آیتم را ایجاد کنیم پس یک فایل به نام list_layout.xml ایجاد کرده و کدهای زیر را در آن قرار دهید.
1 2 3 4 5 6 7 8 9 10 11 12 13 14 15 16 17 18 19 20 21 22 23 24 25 26 27 28 29 30 | <?xml version="1.0" encoding="utf-8"?> <LinearLayout xmlns:android="http://schemas.android.com/apk/res/android" android:layout_width="match_parent" android:layout_height="wrap_content" android:orientation="vertical"> <android.support.v7.widget.CardView android:layout_width="match_parent" android:layout_height="wrap_content" android:layout_margin="5dp"> <LinearLayout android:layout_width="match_parent" android:layout_height="wrap_content" android:orientation="vertical"> <TextView android:id="@+id/textViewUsername" android:layout_width="match_parent" android:layout_height="wrap_content" android:padding="5dp" android:text="Mohammad Hossein" android:textAppearance="@style/Base.TextAppearance.AppCompat.Large" /> <TextView android:id="@+id/textViewAddress" android:layout_width="match_parent" android:layout_height="wrap_content" android:padding="5dp" android:text="Jafaripour" android:textAppearance="@style/Base.TextAppearance.AppCompat.Medium" /> </LinearLayout> </android.support.v7.widget.CardView> </LinearLayout> |
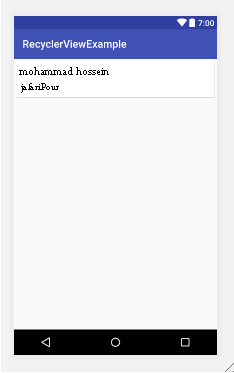
کد بالا شکل ظاهری همانند زیر ایجاد می کند.
حالا باید یک کلاس Model درست کنیم اگر یادتان باشد در جاوا هم این کار رو انجام میدادیم و به آن getter و setter می گفتیم پس یک فایل کوتلین به نام User.kt ایجاد کرده و کدهای زیر را در آن قرار دهید.
1 2 3 4 5 | package ir.programchi; /** * Created by Jefferson on 6/19/2017. */ data class User(val name: String, val address: String) |
دید که چقدر حجم آن کم است در بالا یک کلاس model شامل دو ورودی به نام name و address از نوع String ایجاد شده است.
هم اکنون باید یک آداپتور سفارشی برای آیتم های RecyclerView به نام CustomAdapter.kt ایجاد کنیم و کدهای زیر را در آن قرار دهیم.
1 2 3 4 5 6 7 8 9 10 11 12 13 14 15 16 17 18 19 20 21 22 23 24 25 26 27 28 29 | package ir.programchi; import android.support.v7.widget.RecyclerView import android.view.LayoutInflater import android.view.View import android.view.ViewGroup import android.widget.TextView /** * Created by Jefferson on 6/19/2017. */ class CustomAdapter(val userList: ArrayList<User>) : RecyclerView.Adapter<CustomAdapter.ViewHolder>() { override fun onCreateViewHolder(parent: ViewGroup, viewType: Int): CustomAdapter.ViewHolder { val v = LayoutInflater.from(parent.context).inflate(R.layout.list_layout, parent, false) return ViewHolder(v) } override fun onBindViewHolder(holder: CustomAdapter.ViewHolder, position: Int) { holder.bindItems(userList[position]) } override fun getItemCount(): Int { return userList.size } class ViewHolder(itemView: View) : RecyclerView.ViewHolder(itemView) { fun bindItems(user: User) { val textViewName = itemView.findViewById(R.id.textViewUsername) as TextView val textViewAddress = itemView.findViewById(R.id.textViewAddress) as TextView textViewName.text = user.name textViewAddress.text = user.address } } } |
کد بالا همان آداپتور ما در جاوا است فقط در اینجا به زبان کوتلین تبدیل شده است .
و در آخر در MainActivity.kt اکتیویتی اصلی کدهای زیر را قرار میدهیم.
1 2 3 4 5 6 7 8 9 10 11 12 13 14 15 16 17 18 19 20 21 | package net.simplifiedcoding.recyclerviewexample import android.support.v7.app.AppCompatActivity import android.os.Bundle import android.support.v7.widget.LinearLayoutManager import android.support.v7.widget.RecyclerView import android.widget.LinearLayout class MainActivity : AppCompatActivity() { override fun onCreate(savedInstanceState: Bundle?) { super.onCreate(savedInstanceState) setContentView(R.layout.activity_main) val recyclerView = findViewById(R.id.recyclerView) as RecyclerView recyclerView.layoutManager = LinearLayoutManager(this, LinearLayout.VERTICAL, false) val users = ArrayList<User>() users.add(User("Mohammad Hossein", "JafariPour")) users.add(User("Ali", "JFP")) users.add(User("Kianosh", "gorbani")) users.add(User("Sepehr", "Jfp")) val adapter = CustomAdapter(users) recyclerView.adapter = adapter } } |
در اینجا یک array درست کردیم و یکسری داده Sample در آن قرار دادیم و RecyclerView را Render کردیم.
این آموزش هم به پایان رسید.
موفق و سرافراز باشید.
 آموزش برنامه نویسی اندروید |


