آموزش ساخت کرنومتر در برنامه نویس اندروید
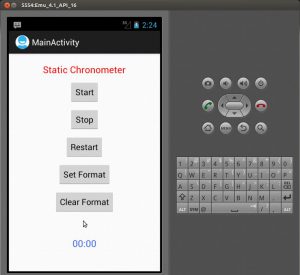
سلام دوستان در این سری از آموزش برنامه نویسی اندروید به آموزش ساخت کرنومتر در برنامه نویس اندروید می پردازیم از کرنومتر برای محاسبه زمان استفاده می شود در ادامه می توانید پیش نمایشی از آن را مشاهده کنید با ما همراه باشید.


ابتدا وارد layout خود شده در اینجا نام آن برابر با activity_main.xml است و کد های زیر را در آن قرار دهید.
1 2 3 4 5 6 7 8 9 10 11 12 13 14 15 16 17 18 19 20 21 22 23 24 25 26 27 28 29 30 31 32 33 34 35 36 37 38 39 40 41 42 43 44 45 46 47 48 49 50 51 52 53 54 55 56 57 58 59 60 61 62 63 64 65 | <RelativeLayout xmlns:android="http://schemas.android.com/apk/res/android" xmlns:tools="http://schemas.android.com/tools" android:layout_width="match_parent" android:layout_height="match_parent" > <TextView android:id="@+id/textView1" android:textColor="#FF0000" android:textSize="20dp" android:layout_width="wrap_content" android:layout_height="wrap_content" android:layout_alignParentTop="true" android:layout_centerHorizontal="true" android:layout_marginTop="20dp" android:text="Static Chronometer" /> <Button android:id="@+id/button1" android:layout_width="wrap_content" android:layout_height="wrap_content" android:layout_below="@+id/textView1" android:layout_centerHorizontal="true" android:layout_marginTop="10dp" android:text="Start" /> <Button android:id="@+id/button2" android:layout_width="wrap_content" android:layout_height="wrap_content" android:layout_below="@+id/button1" android:layout_centerHorizontal="true" android:layout_marginTop="10dp" android:text="Stop" /> <Button android:id="@+id/button3" android:layout_width="wrap_content" android:layout_height="wrap_content" android:layout_below="@+id/button2" android:layout_centerHorizontal="true" android:layout_marginTop="10dp" android:text="Restart" /> <Button android:id="@+id/button4" android:layout_width="wrap_content" android:layout_height="wrap_content" android:layout_below="@+id/button3" android:layout_centerHorizontal="true" android:layout_marginTop="10dp" android:text="Set Format" /> <Button android:id="@+id/button5" android:layout_width="wrap_content" android:layout_height="wrap_content" android:layout_below="@+id/button4" android:layout_centerHorizontal="true" android:layout_marginTop="10dp" android:text="Clear Format" /> <Chronometer android:id="@+id/chronometer1" android:textColor="#4169E1" android:textSize="20dp" android:layout_width="wrap_content" android:layout_height="wrap_content" android:layout_below="@+id/button5" android:layout_centerHorizontal="true" android:layout_marginTop="50dp" android:text="Chronometer" /> </RelativeLayout> |
سپس در بخش اکتیویتی خود (در اینجا برابر با MainActivity.java) و کدهای زیر را در آن قرار دهید.
1 2 3 4 5 6 7 8 9 10 11 12 13 14 15 16 17 18 19 20 21 22 23 24 25 26 27 28 29 30 31 32 33 34 35 36 37 38 39 40 41 42 43 44 45 46 47 48 49 50 51 52 53 54 55 56 57 58 | package ir.programchi; import android.os.Bundle; import android.os.SystemClock; import android.app.Activity; import android.view.Menu; import android.view.View; import android.widget.Button; import android.widget.Chronometer; public class MainActivity extends Activity { Chronometer focus; Button start, stop, restart, set, clear; @Override public void onCreate(Bundle savedInstanceState) { super.onCreate(savedInstanceState); setContentView(R.layout.activity_main); start = (Button) findViewById(R.id.button1); stop = (Button) findViewById(R.id.button2); restart = (Button) findViewById(R.id.button3); set = (Button) findViewById(R.id.button4); clear = (Button) findViewById(R.id.button5); focus = (Chronometer) findViewById(R.id.chronometer1); start.setOnClickListener(new View.OnClickListener() { @Override public void onClick(View v) { // TODO Auto-generated method stub focus.start(); } }); stop.setOnClickListener(new View.OnClickListener() { @Override public void onClick(View v) { // TODO Auto-generated method stub focus.stop(); } }); restart.setOnClickListener(new View.OnClickListener() { @Override public void onClick(View v) { // TODO Auto-generated method stub focus.setBase(SystemClock.elapsedRealtime()); } }); set.setOnClickListener(new View.OnClickListener() { @Override public void onClick(View v) { // TODO Auto-generated method stub focus.setFormat("Formated Time - %s"); } }); clear.setOnClickListener(new View.OnClickListener() { @Override public void onClick(View v) { // TODO Auto-generated method stub focus.setFormat(null); } }); } } |
این آموزش هم به پایان رسید.
موفق و پیروز باشید.
 آموزش برنامه نویسی اندروید |


به کرونمتر میخوام که از زمان مشخصی که تعیین میکنم به بعد رو شمارش کنه
مثلا بجای صفر از 1:55:34.5 که من تعیین کردم بشماره
راحت تر بگم.
کاربر تعیین کنه از چه زمانی شروع به شمارش بشه
سلام آقای جعفری پور
از پاسخگویی شما ممنونم
من خیلی از سایت شما استفاده میکنم و جواب میگیرم. ممنونم
کرونومتر شما صدم ثانیه نداره من از این جا پیدا کردم
https://www.android-examples.com/android-create-stopwatch-example-tutorial-in-android-studio/#comment-19278
و تست هم کردم تو یه پروژه جدا کار میکرد ولی وقتی گذاشتم داخل فایل جاوا که اکستندز شده بود از فرگمنت از این قسمت ایراد میگیره… میشه یه نگاهی به این کد بندازین?
http://s9.picofile.com/file/8335403250/Capture.JPG
سلام و درود
چون دارید از فرگمنت استفاده می کنید به جای two.this باید getContext رو استفاده کنید.
موفق باشید.
با سلام
من از این کرنومتر در ریسایکلر ویو استفاده کردم و مثل همیشه از پوزیشن کلاس onBindViewHolder استفاده کردم
تقریبا داشتم اپ رو تموم میکردم ولی متاسفانه به یه مشکل خوردم
زمانی که لیست رو اسکرول میکنم مقادیر کرنومترم جابجا میشه
چک کردم پوزیشنم تغییر نمیکنه
انگار مشکل از خود کرنومتره
ممنون میشم راهنماییم کنید
سلام چطوری اعداد کرونومتر را فارسی کنیم؟
عالی
خیلی ممنون
فقط کاش طرز تبدیل به ساعت هم وجود داشت
سلام . من در پروژه ها ی جدیدی که ایجاد می کنم ، در هنگام بیلد کردن ، با ارور زیر مواجه می شوم . اما در پروژه های قدیمی در هنگام بیلد کردن چنین مشکلي وجود ندارد :
ERROR:C:\Users\TOOSCOM\.gradle\gradle-5.6.4-all\caches\transforms-3\b6f0d187be5c9a123a53118d219dfb77\transformed\material-1.5.0\res\values-v31\values-v31.xml:3:5-94: AAPT: error: resource android:color/system_neutral1_1000 not found.